


To become a Blinkit seller, start with the official Seller Hub, prepare your business and brand documents, then complete product and supply requirements shown for your account. Registration is only the beginning: product approval, activation, inventory and unit economics need separate attention.
This guide explains the workflow using Blinkit's public onboarding information and official Seller Hub guide. The screenshots below come from that guide, accessed on 7 November 2026, not a demonstration account operated by Brainvative. Your account's current instructions and commercial terms take precedence where the interface or requirements differ.
Blinkit seller registration: quick start
Start on the official Blinkit Seller Hub. Choose Start selling for registration or Login for an existing account. Brainvative is an independent guide, not Blinkit's login portal or approval team. Do not enter your seller password or OTP on this website.
- Prepare business details: collect the documents below and check that the names and records agree.
- Register and complete verification: follow the fields and checks shown in your account. A sign-in or verified document does not mean every product is approved.
- Create product listings: enter accurate catalogue information and follow the product-review process.
- Check costs before activation: review your product-specific commission and other fees. Free registration is not a cost-free launch.
- Arrange inventory and monitor sales: follow the approved shipment process, confirm receipt and reconcile payouts.
Public registration and fee guidance checked on 16 November 2026. Your account's current instructions govern the actual application. Delivery-partner and store-partner applications are different routes.
Documents checklistCommission and feesDetailed registration steps
1. Open the official seller registration portal
- Visit Blinkit Seller Hub directly.
- Use a business-controlled email address and phone number, and complete the verification requested by the portal.
- Keep account recovery details with the business owner. Do not share OTPs or your primary login with an unsolicited onboarding agent.
- Review the registration fields before uploading documents so that legal names and contact details remain consistent.
Selling products is different from applying as a delivery partner or operating a store. Check that you have chosen the seller route before providing business information.
2. Blinkit seller registration documents checklist
The current Seller Hub registration FAQ lists brand and manufacturer details, a logo, GST and bank details, a digital signature and FSSAI licensing where applicable. Use this preparation table, then follow any additional checks in your account. It is not a promise that the list covers every product category.
| Group | Prepare | Applicability and check |
|---|---|---|
| Business and brand | Brand name, manufacturer information and logo. | Listed in the public FAQ; check the details against your product packaging. |
| Tax registration | GST certificate and matching business details. | Listed in the public FAQ; obtain qualified advice for your tax circumstances. |
| Payout account | Bank account details. | Listed in the public FAQ; check the information before submitting. |
| Signing | Digital signature. | Listed in the public FAQ; follow the format requested in your account. |
| Food-related licensing | FSSAI licence where applicable. | Conditional, not a universal requirement for every product. |
| Additional account checks | Brand authorization, trademark evidence or other supporting records if requested. | Do not assume the short public FAQ lists every verification request. |
- Check that the business name matches across the records you submit.
- Make scans readable and use the upload format and size requested in the portal.
- If selling another brand, obtain the appropriate authorization rather than implying ownership.
- Ask your accountant to check tax and invoicing details where you are unsure.
The current onboarding FAQ says onboarding completes in real time once the required documents are successfully verified. It does not provide a guaranteed time for document verification, product approval or a first sale. Keep your reference details and respond to correction requests through the official portal.
3. Check the current supply model, not an old APOB tutorial
The official Seller Hub guide, page 35, states that APOB is not required to launch and scale on Blinkit from 1 September 2025. It describes inventory being billed to BCPL and sent to the identified location.
Do not start a warehouse-registration amendment simply because an older article tells you to. Confirm the instructions for your own account and seek qualified advice for your business's tax obligations. Never publish tax credentials, bank documents or access keys in a support screenshot.
4. Build and submit a product listing
- In the catalogue area, choose the option to add a product.
- Enter the actual brand, product identifier and category. Check the physical packaging rather than copying an unrelated listing.
- Complete the relevant attributes, including dimensions, shelf life and storage requirements.
- Review pricing and tax fields, including the business category used for commercial calculations.
- Add accurate product and packaging images in the formats requested.
- Review the preview, submit and retain the request ID for tracking.
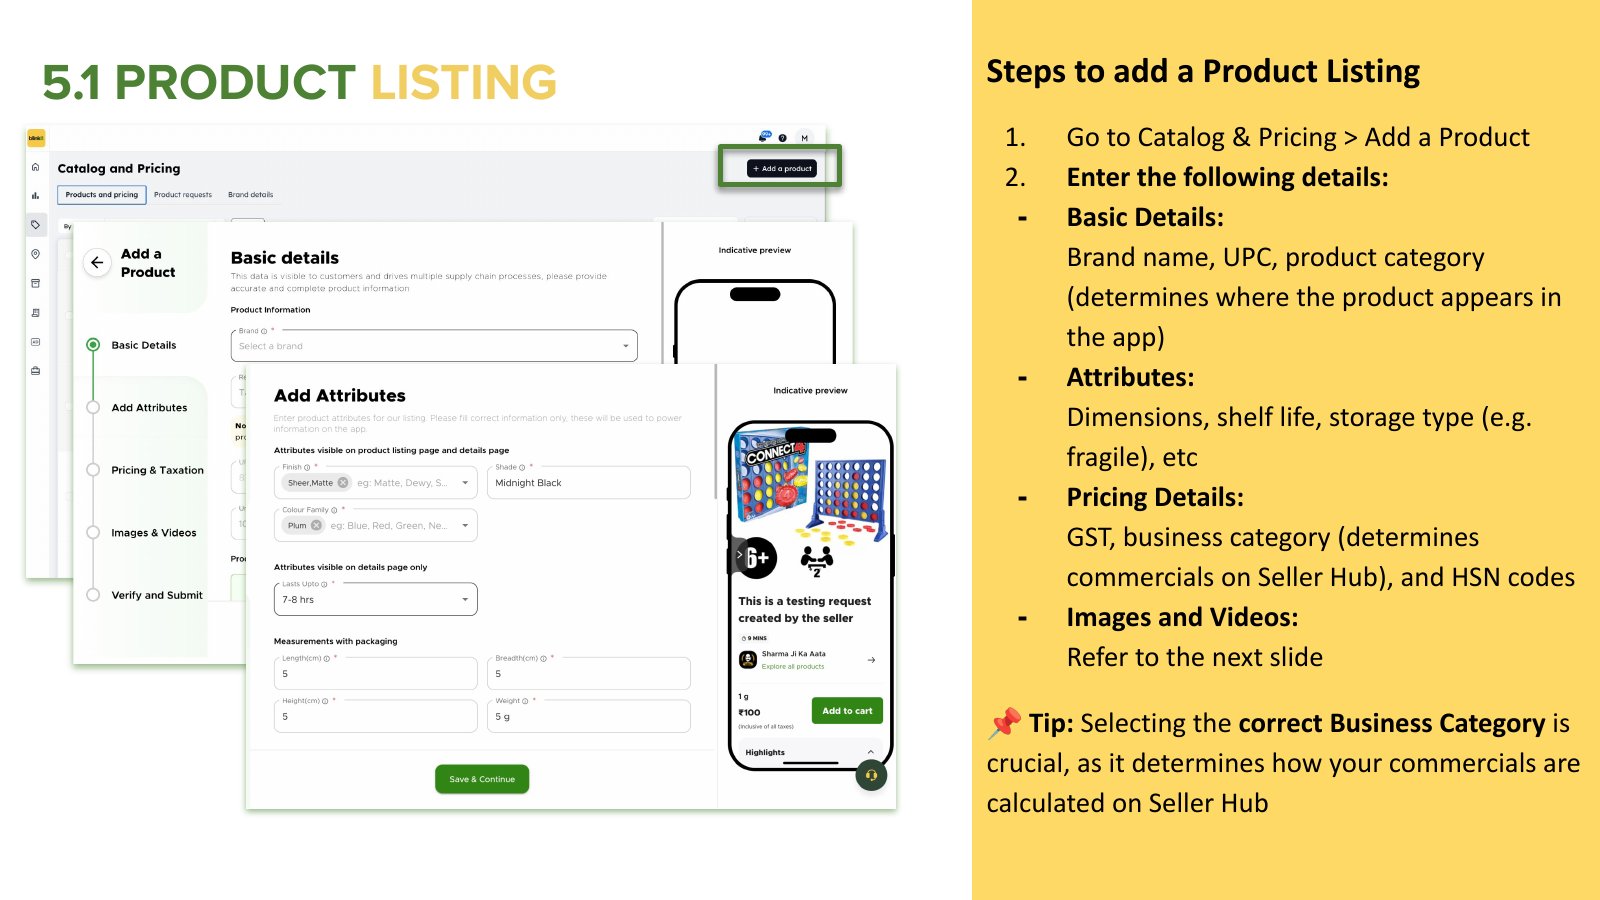
Before submission, compare the listing with a real unit of stock. A wrong pack quantity, unreadable barcode or incorrect dimension can create avoidable corrections. Keep a working catalogue file with the identifier, pack size, images and request status for each SKU.
For the broader principles of accurate catalogue content, read our Amazon SEO and listing-quality guide. Amazon's rules are not Blinkit's rules; use the Blinkit instructions for actual submission.
5. Blinkit seller commission, activation and other fees
Blinkit's official fees page says registration is free, but product activation has a charge credited to the advertising wallet. Free registration therefore does not mean a cost-free launch. Confirm the amount and conditions displayed in your account before paying.
| Cost | When it applies | What to confirm |
|---|---|---|
| Registration | No registration fee, according to Blinkit's public FAQ. | Keep registration separate from product activation and operating costs. |
| Product ID activation | Activation charge, credited to the ads wallet. | Current amount and wallet conditions in your account. |
| Inwarding | Per unit received into a warehouse. | Product-specific receiving charge. |
| Storage | Daily for unsold units. | Daily rate and likely holding time. |
| Fulfilment | For delivered customer orders. | Applicable fulfilment charge. |
| Category commission | On sales; varies with category and pricing. | Use the Seller Hub calculator, not a universal percentage. |
| Customer returns | When the return reason is attributed to the seller. | Applicable charges and dispute process. |
| Inventory removal | Per unit when removal is requested. | Removal charge before requesting withdrawal. |
Source: Blinkit fees and commissions, checked 16 November 2026. These are cost categories, not a fee quote. Obtain product-specific amounts from your account before committing inventory.
Create a SKU-level worksheet before deciding whether to proceed. Record expected selling price, product cost, packaging, transport, platform deductions, advertising and a provision for unsold stock. Test a slower-sales scenario as well as your expected case. This is a planning exercise, not a forecast of guaranteed profit.
Separate product-activation charges, advertising credit and cash available for inventory. Wallet credit is not the same as a bank payout. Save the applicable fee information with the date so later reconciliation uses the right terms.
6. Resolve product-review issues
Track each request separately. If a listing is rejected, read its stated reason, correct the relevant information and resubmit through the account workflow. Do not repeatedly create duplicate products to bypass a rejection.
Check identifier accuracy, required attributes, packaging measurements and image consistency first. When asking support for help, provide the request ID and a precise description of the issue, without including passwords or OTPs. Approval timing can differ from registration verification.
7. Arrange your first inventory shipment
- Use the inventory consignment workflow and select the relevant warehouse.
- Choose the approved items and quantities, respecting the account's recommendations and limits.
- Review the shipment appointment and supply address before finalizing.
- Prepare the requested shipment paperwork and organize transport according to the instructions shown.
- After delivery, check what was actually received and resolve discrepancies with the shipment reference.
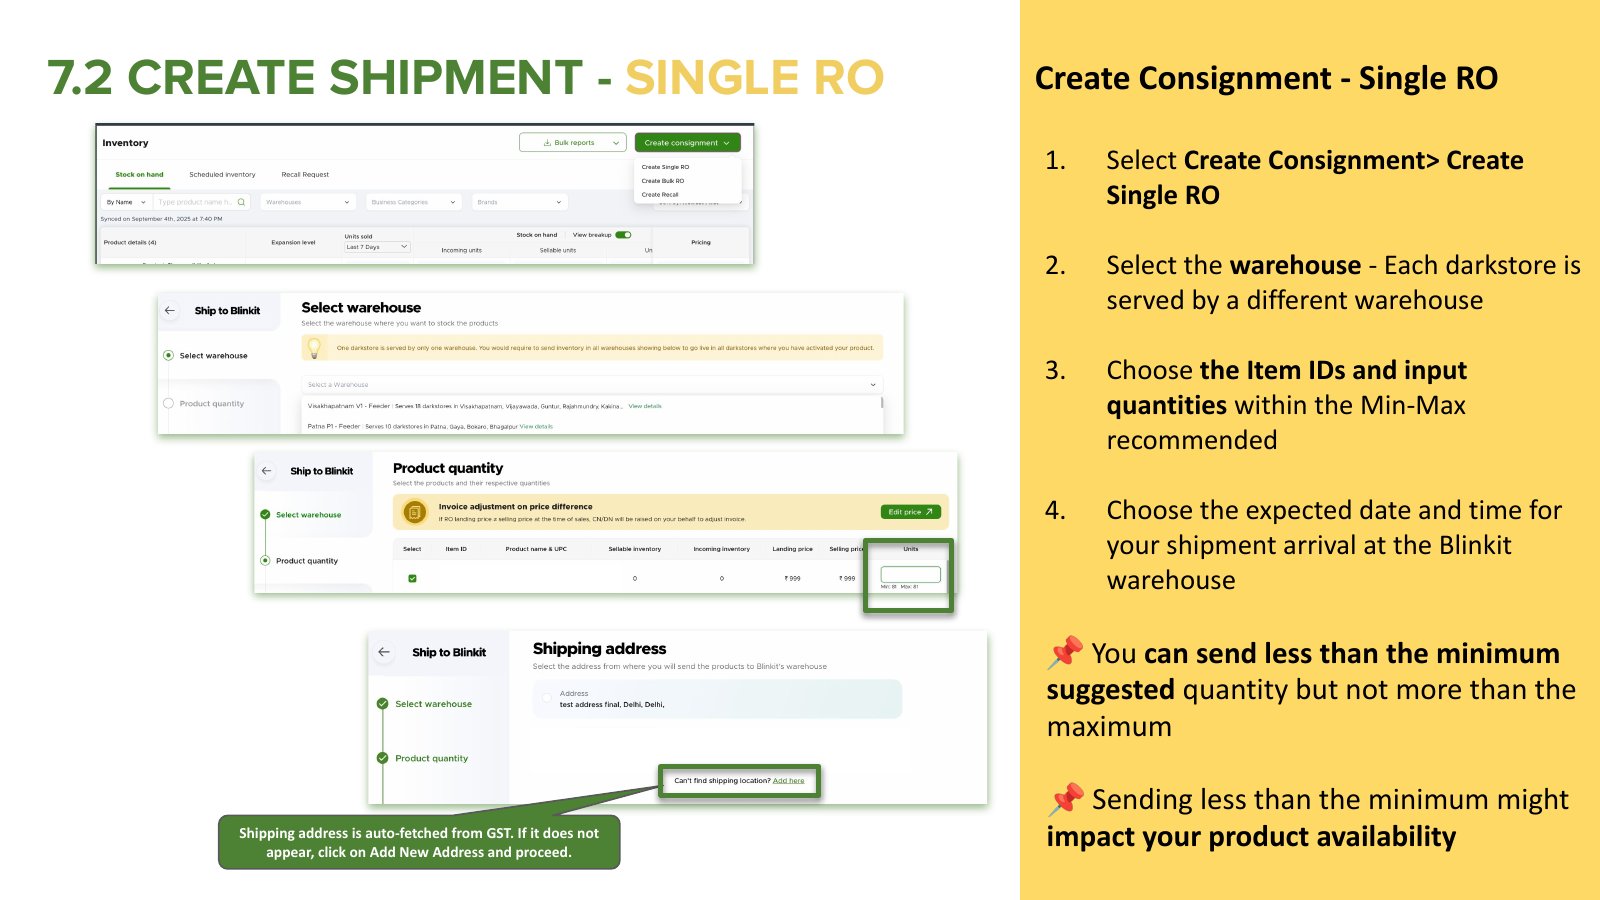
A dispatch is not proof that a product is available to customers. Keep dispatched, received and saleable stock separate in your records. Start with quantities your business can support and review availability before scaling replenishment.
8. Reconcile payouts and assess actual performance
The public fees FAQ describes payment on the third working day after each half-month payout cycle, after deductions. Check your account's applicable schedule rather than assuming payment arrives on the 15th or 30th.
Review payout statements against invoices, deductions, returns and bank receipts. Track orders and contribution after costs, not just sales value. Record stock interruptions, price changes and advertising alongside the results so you do not mistake a promotion for sustainable demand.
Keep sponsored performance separate from other sales observations. A larger advertising budget does not guarantee profitable growth or broader distribution. Our ecommerce marketing guide explains how to assess marketing activity alongside margin and customer experience.
Frequently asked questions
Is Blinkit seller registration free?
Registration and product activation are different stages. Check the official fees page and your account's activation terms before budgeting for launch.
Does every seller need a registered trademark certificate?
The current short registration FAQ does not list a trademark certificate as a universal requirement. This does not mean brand checks are waived. Follow requests for trademark evidence or authorization in your account, especially when selling another brand.
Can an agency guarantee approval or negotiate every fee?
No such guarantee should be assumed. Ask what work is included and retain control of your account. Platform decisions and commercial terms must be confirmed directly with Blinkit.
Where can I check the screenshots and full instructions?
Read the official Seller Hub guide alongside the help available in your account. The illustrations above are source material, not screenshots of a Brainvative client account.
Brainvative can discuss your catalogue content and wider ecommerce requirements. Explore our ecommerce development services for your own online store, without confusing website development with Blinkit approval or platform eligibility.
