Blinkit has revolutionized India’s quick-commerce sector, delivering groceries, electronics, and daily essentials in under 10 minutes. For businesses, this platform offers unparalleled access to hyperlocal customers, with over 10 million monthly active users. However, navigating Blinkit’s onboarding process can be daunting, especially for new sellers. In this guide, Brainvative—a trusted partner for e-commerce optimization—breaks down the documents, costs, and insider tips you need to launch and scale your store on Blinkit.
Why Sell on Blinkit?
Hyperlocal Reach: Serve customers within a 2-3 km radius of Blinkit’s dark stores.
Quick-Commerce Advantage: Capitalize on India’s $5 billion instant-delivery market.
High Visibility: Listings appear to users searching for immediate purchases.
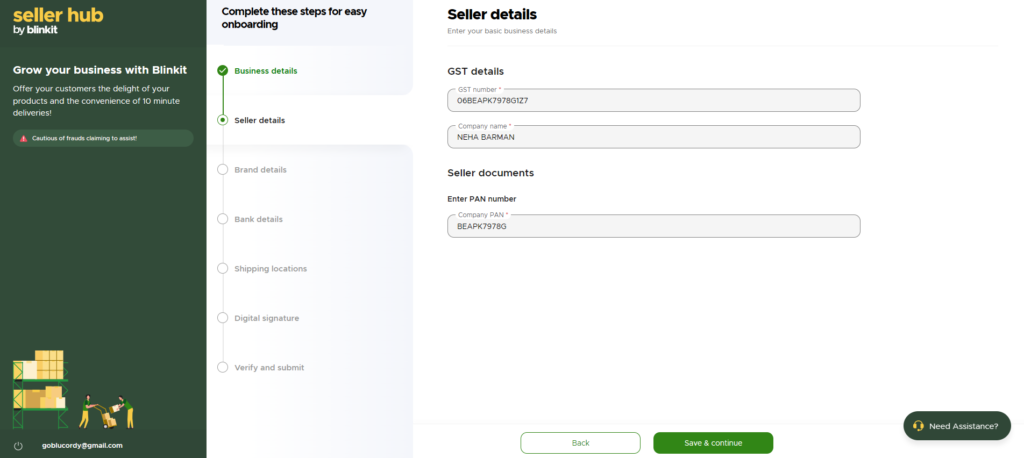
Complete List of Required Documents & Criteria
To become a seller on Blinkit, you’ll need to provide the following documents and information:
Basic Information
Business Email & Phone Number: Essential for account creation and communication.
GSTIN (Goods and Services Tax Identification Number): Mandatory for tax compliance.
FSSAI License: Required if you’re selling consumable products to ensure food safety compliance.
Business Details
Product Category & Sales Channels: Specify the categories of products you intend to sell and your existing sales channels (e.g., Amazon, Flipkart, own website).
Owner/Manager Contact Information: Provide the name, email, phone number, and designation of the primary contact person.
Seller Identity Proofs
PAN Card: Permanent Account Number for tax purposes, either for the business or the individual proprietor.
GST Registration Certificate: Confirms your registration under the GST regime.
Brand Documentation
Brand Name & Manufacturer Details: Information about your brand and manufacturing entity.
Trademark Number & Certificate: Proof of trademark registration to establish brand authenticity.
Brand Authorization Letter: If you’re not the brand owner, an authorization letter permitting you to sell the brand’s products. (Sample provided below)
Brand Logo: High-resolution logo (500×500 pixels, JPG/PNG) for brand recognition.
Bank Account Details
Account Holder Name & Number: For payment processing.
IFSC Code: Identifies your bank branch.
Account Type: Specify whether it’s a current or savings account.
Shipping & Warehouse Locations
Warehouse Address: As per GST records.
FSSAI Certificate: Required if dealing with food products to ensure compliance with food safety standards.
Digital Signature
E-Signature: Draw your digital signature using a mouse or touchpad in the provided box on Blinkit’s platform.
Step-by-Step Guide to Submit Documents
Navigating the document submission process is crucial for a smooth onboarding experience. Here’s a detailed walkthrough:
Email & Phone Verification: Enter your business email and phone number. Verify your phone number via the OTP sent to your device.
3. Provide Business Details:
Business Information: Input your business name, address, and GSTIN.
Contact Details: Provide the name, designation, email, and phone number of the primary contact person.
4. Upload Required Documents:
Identity Proofs: Upload scanned copies of your PAN card and GST Registration Certificate.
Brand Documentation: Submit your Trademark Certificate, Brand Authorization Letter (if applicable), and Brand Logo.
Bank Details: Provide a canceled cheque or bank statement displaying your account number and IFSC code.
FSSAI License: Necessary if you plan to sell food items.
4. Specify Shipping Locations:
Warehouse Address: Confirm the address fetched from your GST records.
Additional Warehouses: If you have multiple warehouses, add their details accordingly.
5. Draw Digital Signature:
E-Signature: Use the provided tool to draw your digital signature using a mouse or touchpad.
6. Review and Submit:
Verification: Double-check all entered information and uploaded documents for accuracy.
Submission: Click on the “Submit” button to send your application for review.
Verification Timeline: Blinkit typically reviews submissions within 2–7 business days. Ensure all documents are clear and legible to avoid delays.
Additional Steps After Document Submission
Once your documents are verified, follow these steps to complete your onboarding:
Locations & APOB Application
Create GSP API Users for E-Way Bill System:
Login to E-Way Bill Portal: Access the E-Way Bill System using your credentials.
Register GSP: Navigate to “Registration” > “For GSP” to create API users.
Select GSP Name: Choose the GSP name provided in your Blinkit dashboard (e.g., Vay Network Services Pvt Ltd) and create user IDs and passwords.
Share Credentials: Provide these credentials to Blinkit for integration purposes.
Download APOB Documents:
Access Provided Documents: Blinkit will supply necessary documents such as NOC and rent agreements for APOB application.
Apply for APOB (Additional Place of Business):
Login to GST Portal: Use your credentials to access the GST portal.
Amend Registration: Go to “Services” > “Registration” > “Amendment of Registration (Core Fields).”
Add Additional Places: Input the warehouse locations provided by Blinkit and upload the corresponding documents.
Submit Application: After submission, you’ll receive an ARN (Application Reference Number).
Submit ARN to Blinkit:
Dashboard Update: Enter the ARN and upload the FSSAI certificate in your Blinkit seller dashboard.
Verification: Blinkit will verify the locations, typically within a few minutes.
Catalog & Pricing Setup
After completing the necessary registrations and approvals, the next crucial step is to set up your product catalog on Blinkit. This involves providing detailed information about each product to ensure accurate listings and optimal customer experience. Below is a comprehensive guide to the information required for each product:
1. Basic Product Information
Brand Name: The official name of the brand under which the product is sold.
Product Name: The specific name or title of the product.
Universal Product Code (UPC): A unique identifier for the product, often found as a barcode.
Unit Type: The measurement unit of the product (e.g., bottle, pack, piece).
Unit Value: The quantity contained in a single unit (e.g., 500 ml, 1 kg).
Product Type: Classification of the product (e.g., perishable, non-perishable).
2. Product Dimensions and Weight
Without Packaging:
Length (cm): The length of the product without packaging.
Breadth (cm): The width of the product without packaging.
Height (cm): The height of the product without packaging.
Net Weight (grams): The weight of the product content excluding packaging.
With Packaging:
Length (cm): The length of the product with packaging.
Breadth (cm): The width of the product with packaging.
Height (cm): The height of the product with packaging.
Gross Weight (grams): The total weight including packaging.
3. Categorization
Product Category: The main category under which the product falls (e.g., Beverages, Snacks).
Business Category: The broader business segment (e.g., Food & Beverages).
4. Attributes
Key Attributes: Specific features or characteristics of the product that are essential for customer information.
5. Case Details
Inner Case Units: Number of units contained within an inner case.
Outer Case Units: Number of units contained within an outer case.
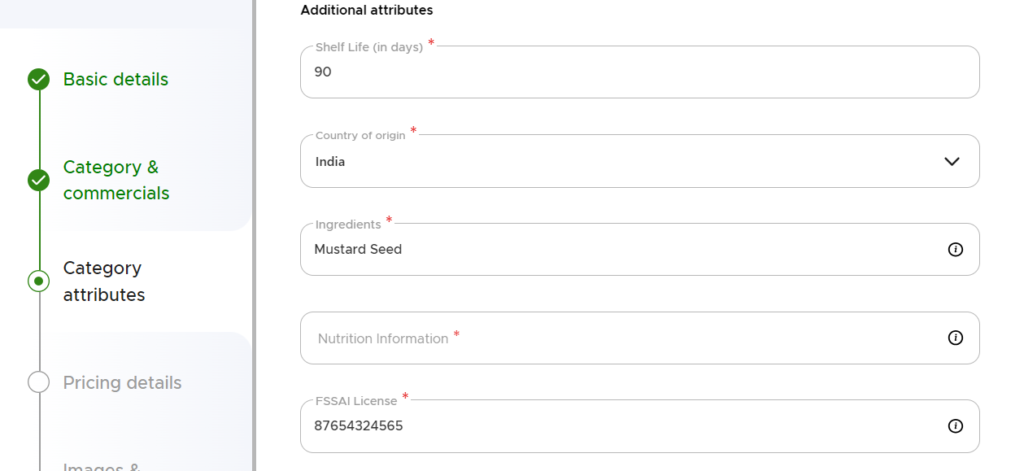
6. Additional Attributes
Shelf Life: The duration for which the product remains usable or saleable.
Country of Origin: The country where the product is manufactured.
Ingredients: List of components or materials used in the product.
Nutritional Information: Details about the nutritional content, especially for consumables.
FSSAI License Number: Mandatory for food products to ensure compliance with food safety standards.
7. Pricing Details
Maximum Retail Price (MRP): The highest price that can be charged for the product.
Selling Price: The price at which the product will be sold to customers on Blinkit.
Landing Price: The cost price of the product after including all expenses.
8. Taxation Information
HSN Code: Harmonized System of Nomenclature code for tax purposes.
IGST (%): Integrated Goods and Services Tax percentage.
CGST (%): Central Goods and Services Tax percentage.
SGST (%): State Goods and Services Tax percentage.
9. Media Uploads
Front Image: Clear image of the product’s front view.
Back Image: Clear image of the product’s back view.
Barcode Image: Image displaying the product’s barcode.
Additional Images: Other relevant images showcasing the product.
Product Video: A short video highlighting the product features (optional but recommended).
Tips for Effective Catalog Setup:
Accuracy: Ensure all information is precise and corresponds with the actual product specifications.
High-Quality Images: Use professional, high-resolution images with a white background to enhance visual appeal.
Comprehensive Descriptions: Provide detailed and honest descriptions to build customer trust.
Compliance: Adhere to Blinkit’s guidelines for product listings to avoid rejections or delays.
By meticulously setting up your product catalog with the above details, you enhance the visibility and credibility of your products on Blinkit, leading to better customer engagement and increased sales.
Inventory Shipment
Ship products to Blinkit’s warehouses based on their recommendations.
Products are transferred to dark stores for faster delivery.
Additional Requirements
Brand Assets: High-resolution logo (PNG/JPG, 500×500 pixels).
Sales Figures: Proof of online/offline sales (invoices or platform reports).
Digital Presence: Links to your website, social media, or marketplace listings.
Blinkit Seller Fees & Charges
1. Pre-Sale Charges
Inwarding Fee: ₹50–200 per unit for warehouse storage.
Storage Fee: Monthly charges based on occupied shelf space (varies by city).
2. Post-Sale Charges
Fulfillment Fee: 5–15% of the product price (covers picking, packing, and delivery).
Category Commission: 10–30% depending on the product type:
Groceries: 10–15%
Electronics: 20–25%
Beauty Products: 25–30%
3. Other Charges
Inventory Recall: ₹100–500 per unit for unsold stock retrieval.
Customer Return: 5–10% deduction for damaged or returned items.
Q: How long does Blinkit onboarding take? A: 7–14 days, provided documents are error-free.
Q: Can I sell private-label products? A: Yes, but you’ll need a trademark certificate.
Q: What if my product listing is rejected? A: Revise packaging/labels per Blinkit’s Seller Guide.
Why Partner with Brainvative?
End-to-End Onboarding Support: From document preparation to APOB activation.
Fee Negotiation: We help reduce commissions and logistics costs.
Post-Launch Strategy: Inventory management, ad optimization, and review monitoring.
Blinkit offers a golden opportunity to tap into India’s booming quick-commerce market—but success demands meticulous preparation. By understanding the fees, documents, and best practices outlined here, you’ll avoid costly mistakes and fast-track your growth.
Ready to Launch on Blinkit? Contact Brainvative for a free consultation and let our experts handle your onboarding seamlessly.
Connect with Brainvative and discover how we can elevate your digital presence. Whether you're looking to enhance your website, boost your SEO, or create impactful marketing strategies, our team is here to help.